本文记录使用RenderTargetBitmap导出Canvas的过程
最基础的尝试
大家可能同过网上一些资料了解到使用RenderTargetBitmap导出Canvas代码如下:
         bool SaveImg(string path)
        {
            try
            {
                RenderTargetBitmap targetBitmap = new RenderTargetBitmap((int)this.c1.ActualWidth, (int)this.c1.ActualHeight, 96d, 96d, PixelFormats.Pbgra32);
                targetBitmap.Render(this.c1);
                PngBitmapEncoder saveEncoder = new PngBitmapEncoder();
                saveEncoder.Frames.Add(BitmapFrame.Create(targetBitmap));
                using (System.IO.FileStream fs = System.IO.File.Open(path, System.IO.FileMode.OpenOrCreate))
                {
                    saveEncoder.Save(fs);
                }
                return true;
            }
            catch (Exception)
            {
                return false;
            }
        }
    <Window x:Class="WpfVisualBrushDemoApp2.Window2"
        xmlns="http://schemas.microsoft.com/winfx/2006/xaml/presentation"
        xmlns:x="http://schemas.microsoft.com/winfx/2006/xaml"
        xmlns:d="http://schemas.microsoft.com/expression/blend/2008"
        xmlns:mc="http://schemas.openxmlformats.org/markup-compatibility/2006"
        xmlns:local="clr-namespace:WpfVisualBrushDemoApp2"
        mc:Ignorable="d"
        Title="Window2" Height="800" Width="1000">
    <Grid  >
        <Grid.RowDefinitions>
            <RowDefinition></RowDefinition>
            <RowDefinition  Height="40"></RowDefinition>
        </Grid.RowDefinitions>
        <ScrollViewer HorizontalScrollBarVisibility="Auto" VerticalScrollBarVisibility="Auto" Name="mainsv" >
            <Canvas  Name="c1"    Background="Black" Height="600" Width="800">

                    <Image  Name="image" Width="600" Height="400" Source="D:\素材\图片\QQ图片20180410163735.jpg"   Stretch="Fill"></Image>
                </Canvas>

        </ScrollViewer>
        <Button Grid.Row="1" Click="Button_Click">导出图片</Button>
    </Grid>
</Window>
上面代码运行起来后点击按钮,可以生成一张800*600的图片,好的 到这里相信大家都没有什么疑问,接下来我们看更高级的。
首先我们看下修改后的xaml:
    <Window x:Class="WpfVisualBrushDemoApp2.Window2"
        xmlns="http://schemas.microsoft.com/winfx/2006/xaml/presentation"
        xmlns:x="http://schemas.microsoft.com/winfx/2006/xaml"
        xmlns:d="http://schemas.microsoft.com/expression/blend/2008"
        xmlns:mc="http://schemas.openxmlformats.org/markup-compatibility/2006"
        xmlns:local="clr-namespace:WpfVisualBrushDemoApp2"
        mc:Ignorable="d"
        Title="Window2" Height="800" Width="1000">
    <Grid  >
        <Grid.RowDefinitions>
            <RowDefinition></RowDefinition>
            <RowDefinition  Height="40"></RowDefinition>
        </Grid.RowDefinitions>
        <ScrollViewer HorizontalScrollBarVisibility="Auto" VerticalScrollBarVisibility="Auto" Name="mainsv" >
            <Canvas  Name="c1"    Background="Black" Height="600" Width="800">
                    <Canvas.LayoutTransform >
                    <TransformGroup>
                        <ScaleTransform ScaleX="0.5" ScaleY="0.5"></ScaleTransform>
                    </TransformGroup>
                </Canvas.LayoutTransform>
                    <Image  Name="image" Width="600" Height="400" Source="D:\素材\图片\QQ图片20180410163735.jpg"   Stretch="Fill"></Image>
                </Canvas>

        </ScrollViewer>
        <Button Grid.Row="1" Click="Button_Click">导出图片</Button>
    </Grid>
</Window>
上面xaml中我们给Canvas添加了一个缩放功能,默认的缩了50%。我们再次运行程序并点击按钮,会发现生成的图片如下:
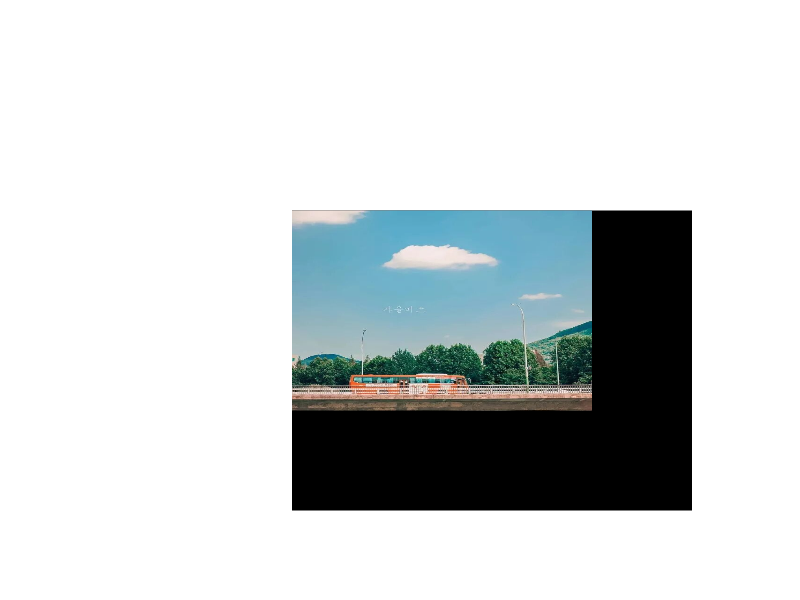
图片依然800*600的分辨率 但是实际的内容缩小了并且其余地方是白色填充。 这显然不是我们想要的效果,思考了一下大概想到有两种方案:
1.用另一个Canvas映射。
2.用ViewBox套在canvas 只对ViewBox缩放。
### 方案一xml
  <Window x:Class="WpfVisualBrushDemoApp2.Window2"
        xmlns="http://schemas.microsoft.com/winfx/2006/xaml/presentation"
        xmlns:x="http://schemas.microsoft.com/winfx/2006/xaml"
        xmlns:d="http://schemas.microsoft.com/expression/blend/2008"
        xmlns:mc="http://schemas.openxmlformats.org/markup-compatibility/2006"
        xmlns:local="clr-namespace:WpfVisualBrushDemoApp2"
        mc:Ignorable="d"
        Title="Window2" Height="800" Width="1000">
    <Grid  >
        <Grid.RowDefinitions>
            <RowDefinition></RowDefinition>
            <RowDefinition  Height="40"></RowDefinition>
        </Grid.RowDefinitions>
        <Canvas   ClipToBounds="True"  Name="c1" Width="400">
            <Canvas.Background>
                <VisualBrush Visual="{Binding ElementName=c2}">
                </VisualBrush>
            </Canvas.Background>
        </Canvas>
        <ScrollViewer HorizontalScrollBarVisibility="Auto" VerticalScrollBarVisibility="Auto" Name="mainsv" >
            <Canvas  Name="c2"    Background="Black" Height="600" Width="800">
                    <Canvas.LayoutTransform >
                    <TransformGroup>
                        <ScaleTransform ScaleX="0.5" ScaleY="0.5"></ScaleTransform>
                    </TransformGroup>
                </Canvas.LayoutTransform>
                    <Image  Name="image" Width="600" Height="400" Source="D:\素材\图片\QQ图片20180410163735.jpg"   Stretch="Fill"></Image>
                </Canvas>

        </ScrollViewer>
        <Button Grid.Row="1" Click="Button_Click">导出图片</Button>
    </Grid>
</Window>
运行后发现还是失败了,效果个原先一样。
### 方案二xml
  <Window x:Class="WpfVisualBrushDemoApp2.Window2"
        xmlns="http://schemas.microsoft.com/winfx/2006/xaml/presentation"
        xmlns:x="http://schemas.microsoft.com/winfx/2006/xaml"
        xmlns:d="http://schemas.microsoft.com/expression/blend/2008"
        xmlns:mc="http://schemas.openxmlformats.org/markup-compatibility/2006"
        xmlns:local="clr-namespace:WpfVisualBrushDemoApp2"
        mc:Ignorable="d"
        Title="Window2" Height="800" Width="1000">
    <Grid Background="Green">
        <Grid.RowDefinitions>
            <RowDefinition></RowDefinition>
            <RowDefinition  Height="40"></RowDefinition>
        </Grid.RowDefinitions>
        <!--<Canvas  Name="c1" Width="400" Height="400">
            <Canvas.Background>
                <VisualBrush Visual="{Binding ElementName=c2}">
                </VisualBrush>
            </Canvas.Background>
        </Canvas>-->
        <ScrollViewer HorizontalScrollBarVisibility="Auto" VerticalScrollBarVisibility="Auto" Name="mainsv" Background="Red">
            <Viewbox  Height="600" Width="800">
                <Viewbox.LayoutTransform>
                    <TransformGroup>
                        <ScaleTransform ScaleX="2" ScaleY="2"></ScaleTransform>
                    </TransformGroup>
                </Viewbox.LayoutTransform>
                <Canvas  Name="c1"    Background="Black" Height="600" Width="800">
                    <!--<Canvas.LayoutTransform >
                    <TransformGroup>
                        <ScaleTransform ScaleX="0.5" ScaleY="0.5"></ScaleTransform>
                    </TransformGroup>
                </Canvas.LayoutTransform>-->
                    <Image  Name="image" Width="600" Height="400" Source="D:\素材\图片\QQ图片20180410163735.jpg"   Stretch="Fill"></Image>
                </Canvas>
            </Viewbox>
        </ScrollViewer>
        <Button Grid.Row="1" Click="Button_Click">导出图片</Button>
    </Grid>
</Window>
运行后成功!!!